前言
上一篇 博客介绍了 RecycleView 的基本使用,接下来我们来给列表添加点装饰 - 分割线。
RecycleView 没有像 ListView 一样可以直接在 xml 中或者通过 setDivider()方法设置分割线的方法。它是通过 RecycleView 的 addItemDecoration(ItemDecoration decor) 方法来设置的。很显然,我们需要传入一个 ItemDecoration 对象,这个对象是一个抽象类,官方已经提供了一种常用分割线类:DividerItemDecoration。来看一下用法:
1 | // 这里 LayoutManager 为 LinearLayoutManager |
也很简单有木有,运行代码看下效果: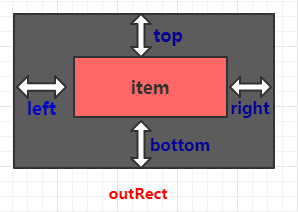
那这个简单的效果是如何实现的呢?前面说过 RecycleView 的分割线是由 RecyclerView.ItemDecoration 这个类来实现的,所以我们要先来了解一下这个类。
一.ItemDecoration 类介绍
惯例先看一下文档中对 ItemDecoration 类的介绍:
An ItemDecoration allows the application to add a special drawing and layout offset to specific item views from the adapter’s data set. This can be useful for drawing dividers between items, highlights, visual grouping boundaries and more.
All ItemDecorations are drawn in the order they were added, before the item views (in onDraw() and after the items (in onDrawOver(Canvas, RecyclerView, RecyclerView.State).
ItemDecoration 允许应用程序为特定的 item 视图添加一个特殊的绘图和布局偏移量。这对于绘制 items 之间的分隔线、高亮显示、可视分组等非常有用。
所有的 item 的装饰都是按照被添加的顺序绘制的,先于 item 的绘制(在onDraw()方法中),和在 item 绘制后 (onDrawOver(Canvas, RecyclerView, RecyclerView.State)方法中)。
从这段介绍中,我们可以得到以下信息:
- ItemDecoration 可以为 item 添加绘图,还可以设置偏移量
- ItemDecoration 可以用于实现 item 之间的分隔线、高亮显示、可视分组等功能
- ItemDecoration 中的
onDraw()方法先于 item 绘制,onDrawOver(Canvas, RecyclerView, RecyclerView.State方法执行顺序在 item 的绘制之后
让我们来新建一个类,继承 RecyclerView.ItemDecoration,默认会要实现它的三个抽象方法:
1 | public class BasicDivider extends RecyclerView.ItemDecoration { |
看一下文档中对这三个方法的说明:
1.getItemOffsets () 方法:
- 重新得到给定 item 的任何偏移量。outRect 的每个字段指定 item 视图应该插入多少像素,效果类似于 padding 或 margin。默认将 outRect 的边界设置为 0 并返回;
- .如果这个 ItemDecoration 不影响 item 视图的位置,在 return 之前要先将 outRect的所有四个字段 (left, top, right, bottom) 设为 0;
- 如果您需要访问适配器以获取额外的数据,您可以调用
getChildAdapterPosition(View)来获取该 View 在适配器中位置;
这个方法中比较关键的就是第一点的理解,设置 outRect 的值,效果类似给 item 设置了 padding 或者 margin。我们可以看一下下图理解一下: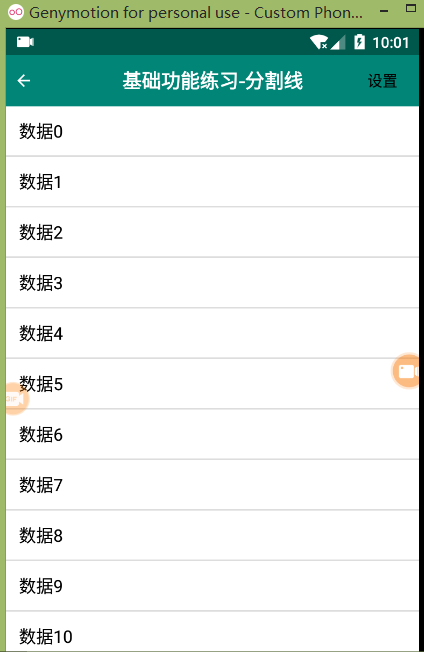
到这其实我们已经可以看到,RecycleView 是通过这个 rectRect 的值来给 item 设置“空隙”,然后达到分割线的效果。
为了更好的理解这个方法,我们在代码中动态设置 outRect 的四个值:
1 | public class BasicDivider extends RecyclerView.ItemDecoration { |
其中的 leftOffset、topOffset、rightOffset、rightOffset 由外部设置得到,这里代码省略,然后看下效果:
需要注意的是通过 getItemOffsets 方法设置分割线,分割线的颜色是 RecycleView 的 backgroundColor 的颜色。所以我们如果想修改分割线的颜色,就必须修改 recycleView 的背景色。
那么假设我想要一个渐变色的分割线或者其他样式的分割线怎么办呢?
答案就是剩下的两个方法 ondraw()和 onDrawOver()方法 可以上场了。
2.onDraw () 方法:
Draw any appropriate decorations into the Canvas supplied to the RecyclerView. Any content drawn by this method will be drawn before the item views are drawn, and will thus appear underneath the views
在 RecycleView 的画布中绘制任意合适的装饰。通过该方法绘制的内容将在 item 的绘制之前被绘制,因此会在 item 的下方显示
通过这个介绍我们可以知道以下三点:
- onDraw() 方法的使用对象是整个 RecycleView,而不是针对单个的 item
- onDraw()方法可以绘制任何装饰( 通过canvas可以随心所欲)
- 这个方法在 item 之前被绘制,因此位置计算不当,可能会出现被 item 遮挡的情况
那我们来想一下,如何实现在 RecycleView 背景为灰色,但分割线为 “10 px 的红色” 的功能。这里我写下我分析的步骤:
(1).通过 getItemOffsets()方法设置 item 的间距,预留分割线的宽度
(2).通过 onDraw()方法绘制分割线,具体又细分为:
- 计算绘制的位置。因为canvas 是这个 RecycleView 的,所以我们要计算每条线的位置
- 绘制。使用
canvas.drawRect()或者canvas.drawLine()方法进行绘制
看一下主要代码实现:
1 | // 在提供给 RecycleView 的画布中绘制适当的装饰。 |
关于分割线位置的计算,我们可以借助一下图,就会很容易计算: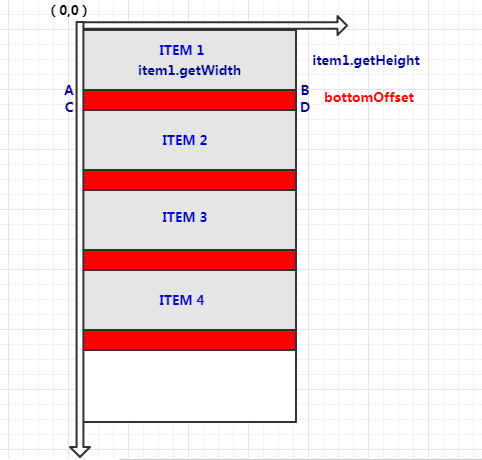
只要计算 A点和 D 点的坐标即可。当然,我这里写的是最简单的情况,不考虑 RecycleView 及 item 的 padding 和 margin,其实计算的时候也是应该考虑进去的。
然后我们运行看一下效果: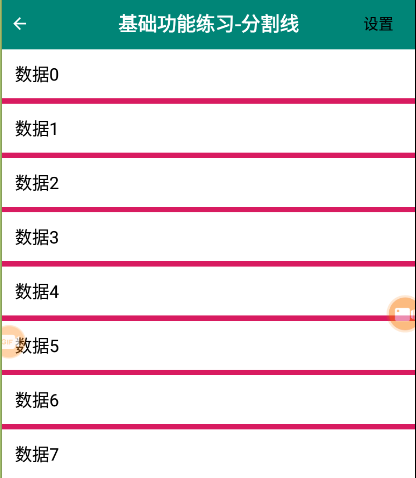
然后来验证一下,onDraw()方法是在 item 之前绘制的,把上述 onDraw()方法中的 bottomOffset = 50,也就是绘制的区域其实是 item 下方 50 px 高度的矩形。
然后运行,发现效果和上一张图一样。也就是说我们绘制的内容被 item 给覆盖住了。
所以,如果想让内容绘制在 item 之上,不被盖住,我们需要了解下面的方法。
3.onDrawOver () 方法:
与 onDraw() 方法作用一样,但是是在 item 之后绘制,所以不会被遮挡覆盖。
我们把例子中 onDraw()方法中的代码移到 onDrawOver () 方法中:
1 | public void onDrawOver(@NonNull Canvas canvas, @NonNull RecyclerView parent, @NonNull RecyclerView.State state) { |
然后看一下效果: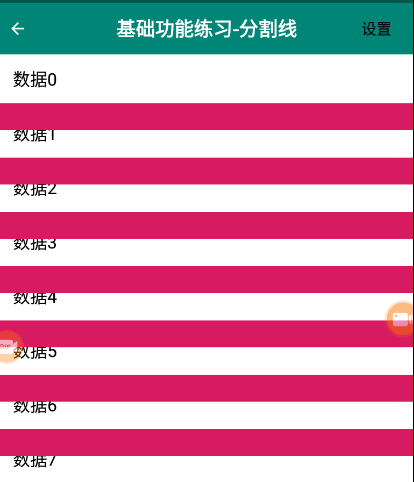
可以看到,方法中绘制的内容会覆盖在 item 之上。也就验证了 onDrawOver () 方法在 item 之后绘制。
二.解析默认分割线的实现
了解了 ItemDecoration 各个方法的作用,下面我们来分析一下默认提供的分割线的内部实现,
先看一下代码:
1 | public class DividerItemDecoration extends RecyclerView.ItemDecoration { |
1.首先来分析一下 getItemOffsets() 方法:
- mDivider 在构造函数中初始化值,为默认的分割线的 drawable 属性值
- 判断 LayoutManger 的方向,如果是 Vertical,就设置 item 的 bottom 偏移默认分割线的高度,如果是 Horizontal 就设置 item 的 right 偏移默认分割线的宽度
2,分析一下 onDraw() 方法
首先进行 LayoutManger 方向的判断,不同的方向,分割线位置计算不同,我们这里就拿最常用的 Vertical 时的状态来看,所以具体看一下 drawVertical()方法:
- 首先通过
parent.getClipToPadding()判断 RecycleView 是否设置这个参数为 true (默认值),如果为 true,那 RecycleView 显示位置区域就不会包含 padding 值的位置,所以需要进行裁剪,否则,显示 padding 区域,也就是 RecycleView 控件本身占的区域 - 遍历 item
- 获取 item 的 坐标位置,包含 item 的 insets 设置的偏移值(比如通过 getItemOffsets 设置的)和 margin 值。
- 计算绘制区域的位置信息
可以看到,官方代码是先得到一个 drawable 对象,然后计算出 item 所以的偏移值,包括我们通过 getItemOffsets 设置的分割线的值,先计算出 bottom,然后根据 bottom 计算 top。最后通过 onDraw() 设置 drawable 的位置来达到分割线的效果。
无疑这种考虑的更全面,我的 demo 是默认 RecycleView 和 item 都没有偏移量的情况。
所以,可以看到,绘制分割线,分割线位置的计算是比较重要的,需要具体情况具体分析。
三. 利用 shape 设置分割线
不知道大家有没有注意到刚刚看的默认分割线的类中,暴露了这样一个方法:
1 | public void setDrawable(@NonNull Drawable drawable) { |
既然是通过 mDivider.draw(canvas); 最后来绘制分割线的,那么只要我们修改了 drawable 对象,分割线的样式也会修改。
所以,对于简单的分割线,我们可以在 shape 文件中设置一个分割线的样式,然后通过默认分割线的 setDrawable()方法设置。
示例代码如下:
1 | DividerItemDecoration itemDecoration = new DividerItemDecoration(this,DividerItemDecoration.VERTICAL); |
效果: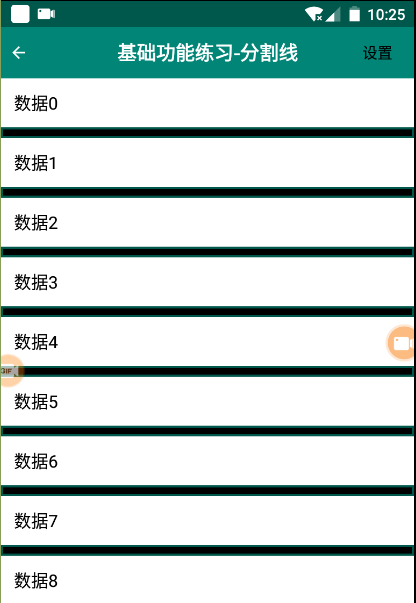
总结
其实分割线的实现很简单,主要掌握 ItemDecoration 内容就好。大致步骤有三点:
1. 通过 getItemOffset() 方法设置 item 的偏移量
2. 在 onDraw()或 onDrawOver() 方法中完成绘制
2.1 遍历 item,计算分割线的位置
2.2 通过 draw()方法完成绘制
其中需要注意的点有:
getItemOffset()方法作用于 itemonDraw()或onDrawOver()方法作用于 RecycleViewonDraw()先于 item 绘制onDrawOver()后于 item 绘制- 计算分割线位置时需考虑 RecycleView 和 item 自身偏移量的问题
参考
https://developer.android.com/reference/android/support/v7/widget/RecyclerView.ItemDecoration